Click here for pricing and availability

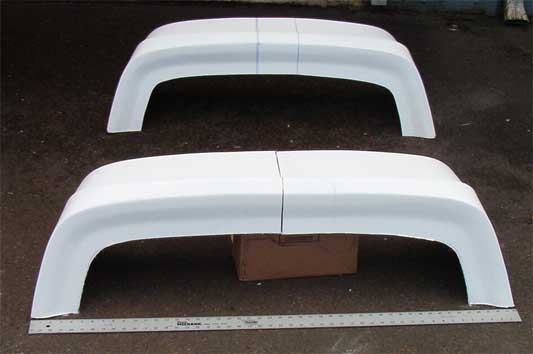
The problem is, folks make Locosts in a wide variety of widths, and it's impractical to make a wide variety of scuttle molds. To deal with this problem, we've come up with a two part scuttle. We took a Catfish scuttle mold (which is already wider than a TTL scuttle—explanation follows) and cut it in half, 2-1/2" off center. Then we made a "splash mold"* that added 5" to the short end of the mold. The result is, the two half-molds can make parts for a scuttle up to 48" wide, as shown above. By cutting as needed from the middle, and bonding the halves together, one can make a scuttle for any chassis from a standard "book" frame (or smaller if one wishes) up to a +6.
You'll note there's no dashboard in this scuttle. We converted to the separate dash camp some while ago for practical and aesthetic reasons, and we and our customers have been cutting the dash panels out of the scuttles to suit our tastes. The practical reason is, having the dash permanently mounted and having the scuttle as a removable cover allows much easier instrument and steering gear installation, modification, and maintenance. The aesthetic reason is, it is difficult to find a less attractive dash material than flat fiberglass (and you'll be looking at it every minute you drive) so <anything> is an improvement. As to why we cut out the dash instead of letting you do it (actually, you'll doubtless be trimming the inside edge—we left you some extra material so we'd be sure you had enough), it saved enough glass, resin, and labor that we can offer this wider scuttle at the same price as the 42" TTL scuttle.
Also you can lower your Superscuttle by up to 4" by trimming the bottoms of the ends. Lowering narrows the scuttle, since the scuttle tapers in as the trimline goes up, but you can compensate by leaving extra material in the middle. if you are going to lower <and> widen the scuttle (if, for example, you're putting a Subaru in a +4, and thus need more width but less height), do the lowering first.

A serendipitous benefit is, the halves can thus be nested into each other for shipping, which saves paying FedEx their Oversize charge. It will save you more than the cost of a quart of fiberglass resin at Home Depot, which you'll need for this project. Now on to work.

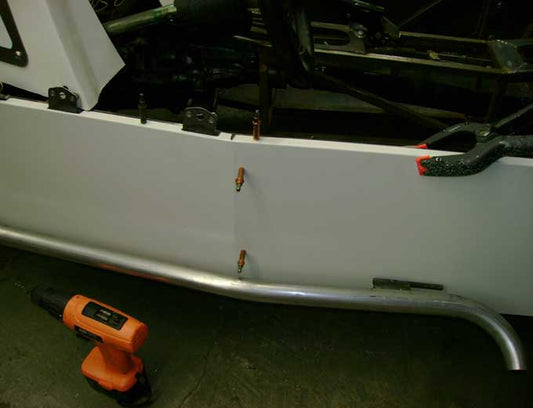
The first step is to figure out how much you want to cut off. This one is going on a 45-5/8" wide chassis, according to the email. I taped the two scuttle halves together, taped two felt pens to a suitable size scrap of wood, and drew two parallel trim lines across the scuttles halves. Ignore the CD box; it was the first straightedge that came to hand.

After trimming (with hacksaw blade, air saw, or saber saw with a fine metal-cutting blade) the inside surface is sanded back 2-1/2" from the centerline on each side, to give a clean "toothy" surface to bond to. the halves are screwed together with sheetrock screws into wood scraps. Make the pilot holes in the fiberglass (and the wood as well) slightly undersize so the threads will grip securely, and cover the holes with a bit of masking tape before inserting the screws.

Making the holes slightly undersize lets you position the scuttle halves more precisely, since you don't have to drive the screws deep and pull the fiberglass to the wood—the fiberglass will "hoover" where you put it, with the threads keeping it from slipping around. Get it right; position it on your chassis before you commit yourself and look it over carefully. Measure twice, laminate once, as the saying goes. When you're happy, tape the outside of the joint together so resin doesn't drool out.

You probably won't have perfect alignment of the edges, which is fine—you're going to do plenty of bodywork to the joint when you're done with the structural job—what is important now is you get the overall shape the way you want it. The parts both dip down slightly at the center, you'll be smoothing that out with body putty eventually, but once the position of the halves is fixed in glass and resin, the only way to improve or adjust their fit is to cut it in half and start over.
Now, if you haven't read Flange Mounting—a fiberglassing primer click here and do so. Get your tools and supplies and safety equipment (the eye protection, the gloves) in order. You'll need a few cheapo natural bristle paintbrushes and a few ounces of laminating resin, but you can get the brushes and a quart of resin from Lowe's Depot or whatever, for less than you saved shipping your scuttle in halves.
From here on out, I'll assume you've read the above article and are going along with the recommendations therein.

Your Superscuttle came with a meter-long strip of fiberglass mat, 6" wide. Cut a 16" length of the mat, and cut it into two strips, one 4" x 16" and one 2" x 16". Cut a piece of the 4" strip that is long enough to cover the inside top of the scuttle, as long as possible but <not> long enough to reach the two wood strips you are bolting the halves together with.
Bond the halves together with the shortened 4" strip. Go ahead and splurge; mix yourself an ounce of resin and let the amount left over be your guide to how much to mix for the remaining laminating operations. Don't get too carried away, because what you absolutely <don't> want to do is bond the wood to the fiberglass. It's a little hard to photograph with the wood in the way, so I'm showing what it'll look like tomorrow.
Yes, this process will take several days. It'll only demand five to fifteen minutes each day, but to do fiberglass right takes time in between for cure. So tomorrow, when the resin has warmed, solidified, and cooled again, unscrew the sheetrock screws and remove the wood bits. Cover the holes with masking tape.

The part will be quite rigid after a day not rigid enough to bolt to a car, but rigid enough that you won't need to screw it together any more. But now, if you like, you can save yourself some bodywork by aligning the edges. In this example, the part on the left was a bit lower (relative to your monitor) than the right, so I screwed one of the wood scraps to the right side to push the left side up.
By the way...notice that my wood scrap is shiny on top. That's because I covered it with a strip of 2" wide Scotch® packaging tape. Most brands of clear packaging tape are similar; a sheet of polyester with a layer of glue on one side and a finish on the other side that resists sticking to the glue. It also resists polyester, vinylester and epoxy resins. If I had got a bit of resin on it during the previous step, it wouldn't have bonded to the scuttle anyway, but it would have required some sanding to prep the scuttle for the next step—as mentioned in the Flange attachment story, neatness counts.
Also note that after pushing the edges into alignment, I took a sanding disk and made the parts the same thickness (the left side was a bit thicker) so the mat would sit flat.

Cut another 16" long piece from the 6" strip of mat, and cut it into two strips, one 3-1/3" wide and one 2-2/3" wide.
Take the leftover bit of the 4" strip and cut it to fit the spaces at the ends of the first piece you laminated. Catalyze two or three ounces of resin (you can always make more, but there's nothing you can do with leftovers) and laminate the 4" bits where the first 4" bit left off. Smoosh the edges around with the brush so they aren't "hard" edges and then laminate the full length of the 3-1/3" strip on top. You should have about half an inch of overhang past the edge of the scuttle; don't flatten it down, leave it sticking up. Drive out the bubbles as described in the Flange story. In an hour or so (check it in 45 minutes, and every10—15 minutes until it gels) you can cut the mat flush with the edge of the scuttle, using a single edged razor blade.
Next day, do the same with the 2-2/3" and 2" strips, which will make the laminate four layers thick in the center, feathering out to one layer thick in 1/3" steps.

Here is the part, two days later and fully cured, showing how well aligned the two sides are. At least I sure hope they are. The main point of doing this is so your scuttle will exactly fit your frame; I made this one to a written description because I needed the photos, but I've been tossing and turning in my sleep ever since because I never checked it against the chassis while I was building it. I don't think I'll do one again unless the frame is in our shop, e.g. we're building a custom scuttle <and> a custom chassis at the same time. I may have made it sound harder than it is; it'll take an hour or so of your time, but it'll be scattered over four days so you won't miss any meals.

Here's what it looks like from the top, if you're a trout. The wide angle lens distorted the sides some, but that's not what I want you to see; I want you to note there is a big fat slice right down the center. If you leave it there, it will be a stress riser; at the very least, once you put some miles on it, eventually you would see a crack forming in your paint job.
The solution? With a sanding drum or disk, sand/grind through that butt joint between the two scuttle halves, all the way down to the first lamina you made. You want a gentle blend between the surfaces, not a sharp edge. All that's left now is conventional bodywork.
*What's a splash mold? It's fiberglasser slang for a cheapass mold made in a single layup, and this one was particularly quick and cheap (we brushed on the gelcoat, there are no flanges on the mold, etc). In the 3rd photo on this page (the one showing measuring the trim lines) you'll note the right part has a mold line where the splash mold starts, and the splashmolded area has shallow bumps and dips (called "alligator" in the trade), and those of you who have been spoiled by the surface quality of our other fiberglass parts may wonder why we did such a slapdash job on this mold extension. It's simple: tooling costs are part of the cost of the part, and thus part of the price, and our objective was a variable-width scuttle kit at the same price as a "book" scuttle. Since either way, you'll be doing a fair bit of sanding and bodyputtying before the joined section is ready to paint, we figured you'd rather do an extra 30 seconds of block sanding than spend an extra twenty bucks so we can make a spiffier mold